One of the primary ways to view and interact with your data in eMediTrack is through Views. You will typically have several Views provided to out-of-the-box, but eventually you may wish to create your own. This article will walk you through the basics of creating a View. After you are comfortable with tools covered in this article you can check out the advanced tutorial here.
In this tutorial, we're going to create a new View in our Work Orders module. We need a quicker way to find High Priority Work Orders, so we're going to make a view that only displays records where the Priority is "0 - Today," or "1 - One Day."
-
Getting Started
Start by navigating to the Module you want to add a view to. In this case, the Work Orders Module. Then, click "Add a View," to start the process.
-
Name your View
You are brought to a New View page.
The first thing you want to do is give your view a title. Do this by clicking on "New View." The text will change into a text box and will accept your title.
-
Scope
Next, we need to set our Scope. For the basic tutorial, we are only going to recommend selecting "Unassigned," and "Everything I Can See." When you're creating a new View or Report, it is best to start all of your data, and then filtering down as you go. Selecting these two options will allow you to see everything that you have permission to see.
Note: When we're creating a View, we cannot change the Primary Module. We will cover Scope in more detail in the advanced article.
To select multiple options in the list, hold down the "Ctrl" button on your keyboard while you click the different options.
-
Modules Tab
Next, we'll move to the Modules tab. This is where we're going to select which fields we want to appear in this view. In the basic tutorial, we will limit our selections to the fields found on the primary module. In the advanced tutorial, we will go over how to bring in data from related modules.
Scroll through the list and select the fields that you would like to appear. Here, I selected WO Number, Priority, and Description. Don't worry about missing a field now, you can always come back and select more later.
It is important to remember that there are always going to be a handful of system fields at the very bottom of the list. System Fields are fields that appear in all modules. You will know you have reached these fields when you find the ones that are not in alphabetical order. Often times, it is very useful to include certain System Fields, like "Added Date" or "Created By," for extra information.
-
Fields Tab
After we have selected our fields, we move to the Fields tab. Listed here are the fields that we selected in the previous step.
Now is a good place to save the view for the first time by clicking "Save Changes." After the page loads, you will see a preview of your report at the bottom of the screen.
Each of the white rows represents one column in the report. Going from left to right across the row, we see the name of the table (module) the field was selected from, the name of column (field), column title, and Link check box.
-
Customizing Fields
While in the fields tab, you can change the order of your columns, change the column title, and make the field linkable.
-
Sorting
In the Sorting section, we can decide how we want the data in the view to be sorted. By default, the records in the view will be sorted in the order that the records were created. It is often helpful to sort the data in your view in a way that makes more sense.
Here, we are going to sort this view so that the highest priority items are on top, and then by Work Order Number.
Ascending - Text will be sorted alphabetically. Numbers will be sorted small to large. (Blank values will be on top)
Descending - Text will be sorted in reverse-alphabetical order. Numbers will be sorted large to small.
-
Filters
Filters are where do the real magic with Views. When we started, we set out to make a View that displayed all High Priority Work Orders. Here is where we can actually make that happen. In the advanced tutorial, we are going to cover how to use filters when you have more than one module in your view.
In this account, High Priority Work Orders are defined as having a priority of either "0 - Today" or "1 - One Day." So, we are going to use filters to make this View only show those Work Orders.
-
From the "Column" drop down, select the field that you want to filter on. Here, we'll select Priority.
-
Chose the appropriate option from the Filter Type drop down. The options in this drop down can change depending on what type of field you selected before. Choosing a number or date will give you different options in this drop down.
-
Here, we are chosing "Contains," which is a pretty general option. As you get more comfortable with using filters, you will probably need to utilize the other options.
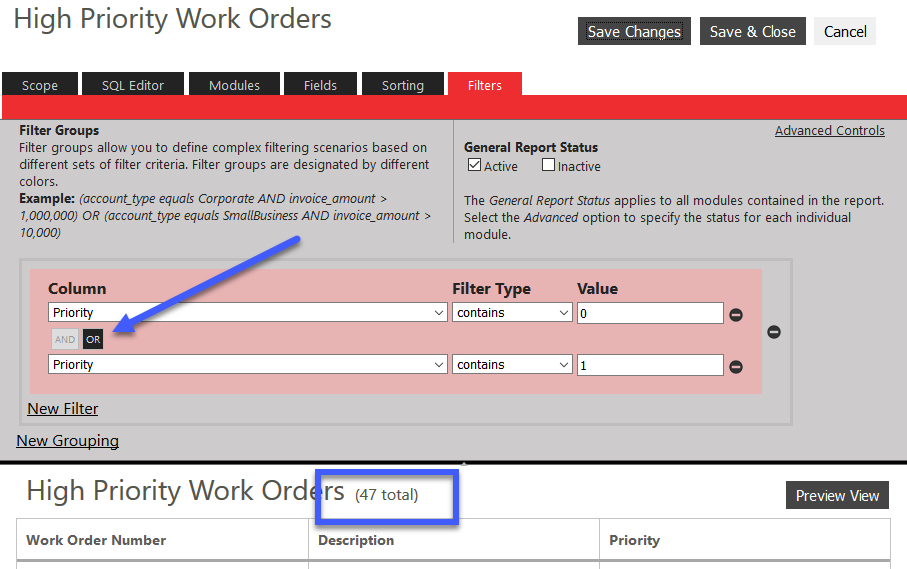
Here, we added a second filter, "Priority contains 1." We clicked the "Or" button in bettwen to say that we want all records where "Priority contains 0," OR where "Priority contains 1."
You will also notice that the number changes as we add filters and save the view.
For a more in depth article on Views, please read the advanced tutorial here!