Scan QR Code - Quick Actions Menu
The Scan QR Code is a section of the Quick Actions Menu that allows you to configure part of the mobile app. A crucial function of the Quick Actions menu is to give the user the ability to scan a QR Code and have a record show up. The QR Code can be associated with any record, but is often associated with assets. The user can walk up to an asset, scan the QR Code on a sticker, and have information about the product show up. This section is all about configuring what information the user will see, and what they can do to make edits to the record, after they scan the code. In the example below, we'll be setting up Quick Actions menu that users can use to do asset inspections and see information about assets they scan.
For a guide about how to get to the Scan QR Code section, as well as more information about the Quick actions menu, read the overview guide here.
How to set up the Quick Scan Menu:
- Navigate to the Scan QR Code Menu. We will be working in Example QA.
This is an image of what the blank form looks like.
- First, we need to fill out the first section. Here, we are going to select the Asset Module as the Primary Module. This is because we are going to be scanning asset QR codes. Once that is selected, we can make a choice from the QR Code Field. We are going to select Asset ID, since that is the key field for the Asset Module. Finally, we are going to put "Scan Asset" in the third field. This is going to be the label of the button the user will press to scan a new code.
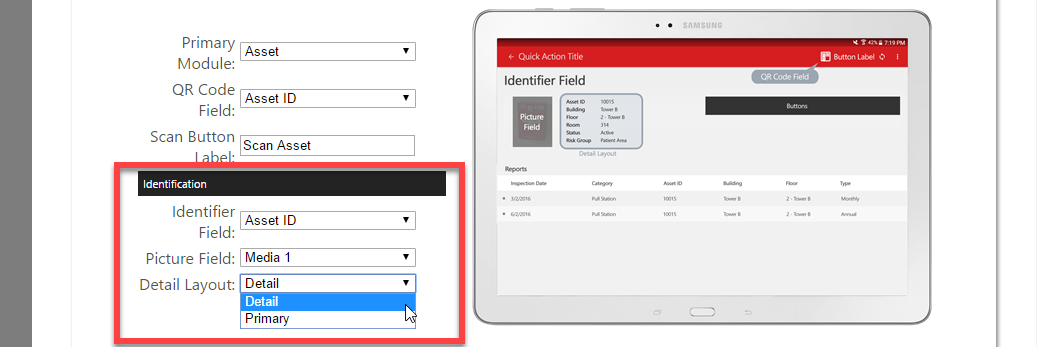
- Next, we have to fill out the Identification section. In the Identifier Field, we put Asset ID. Again, this is the key field of the Asset Module and it is the unique ID we have for the asset. For the Picture Field, we put Media 1. We have our record set up so that Media 1 is the field where we put a picture of the asset. In Detail layout, we put Detail. This is asking you to select the layout you would like to display. We have set up a layout for this specifically, and it is called "Detail."
- Now, we have to fill out the Buttons section. These are buttons that will appear next to or below the Identification Field. Here we are setting up two buttons. A button that the user can press to make changes to the Asset's record, called "Edit Asset," and a button that will start a Work Order for the asset, called "Create Work Order." First you name the button, then you connect it to an app. In the image below, you see the drop down menu. In bold, we have the names of the app, and below those labels, we have the differnt skins. For the Create Work Order button, I chose the Work Order app under PMs (Admin) app group. These are created and manged in the App Builder Menu.

- Lastly, we need to set up some reports for the user to see related to the asset. Our first report will be named Past Due PM's. Now you have to create the report that will be available. This process is the same as creating a regular report. The user will see the report, and be able to click on lines in the report. When they do that, they will be taken to an app to do something. Here we are showing all Past due PM's for this asset. We want the user to be able to see a list, click on an entry, and be able to do that PM. Therefore, for the app, we chose PM. If you want the user to be able to see the PM, but not make changes, check the Read Only Box.
You can have as many reports displayed as you want. To add more, click Add New.