The workflow manager is where you can create automatic processes in eAppTrack. Workflows contain Processes. Processes contain Conditions and Actions. You can have multiple conditions to one process, as well as multiple actions to one process. You can also have multiple processes to one workflow.
To get to get to the Workflow Manager:
- Click on the wrench.
- Click on automation.
- Click on Workflow Manager.
- To add a workflow, click the plus icon.
- Your layout will look like this:
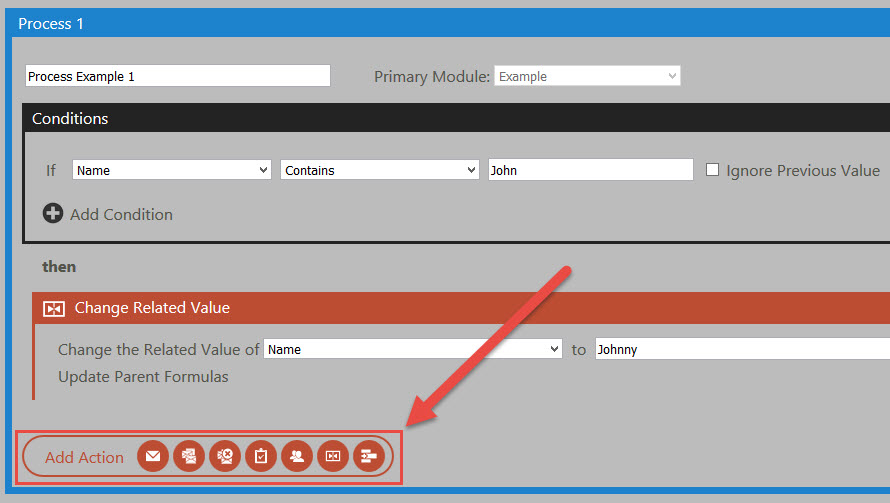
- Give the workflow a name. Select a scope for the workflow. Give the first process a name, and choose the primary module for that process.
- Click on the plus icon next to "Add Condition" to add a condition to this process.
- Select a type of condition. When the condition is met, an Action will be triggered.There are four different condition types:
- By Control -- This has the ability to check the value of any field in any module to see if it matches your specifications. If a record does match the condition, the condition will pass and the Action will be triggered. Next to these conditions, there will be a check box labeled "Ignore Previous Value". For more information on this, see our Ignore Previous Value help article.
- By Date -- This will trigger the Action on a specified date or your choosing.
- By Event -- This will trigger the Action when the primary module is either created, updated, or deleted.
- On Schedule -- This allows you to configure a recurring schedule on which the Action will be triggered regularly.
- Once you have selected a condition, you must now choose an action for the workflow to perform every time the condition is met. Select an Action from the icons at the bottom of the process.
There are seven different types of Actions:
- Add Email -- This will send an email to a specific person (or group of people) when the condition is met. You can build the email from scratch, or you can use an email template.
- Start Campaign -- This will start an email campaign. You must select a campaign that you have already created.
- Stop Campaign -- This will stop an ongoing email campaign.
- Create Task -- This allows you to create a task for yourself and/or others on your team.
- Change Record Owner -- You can change the record owner of the modified record.
- Change Related Value -- This allows you to modify a field of the record in your primary module that triggered the workflow.
- Create Record -- This allows you to create a new record. You can either clone from an existing record, or use a map. For more information on maps, see our Add Map help article.
- Next to the condition, there is a checkbox that says, "Ignore Previous Value." This is an important control in the manager. When records are updated, the workflow process will make some checks to see if any conditions are met. First, it checks to see which values changed and which values did not change. Second, it checks to see if the workflow condition is met. If the Ignore Previous Value box is not checked (default), it only goes to the second step if a value changed. If the box is checked, it skips the first step.
- On the right hand side of the process, you will see two radio buttons, Queued, and Instant. Select Queued if you want the action to occur a few minutes after the condition is met. If you want the action to happen right away, select Instant.
- When you're finished with your workflow, click on Save.